Unboxing Your ITATOO Complete Tattoo Machine Kit: A Beginner’s Guide to Setup
Setting up your first tattoo machine can initially seem daunting, yet the process is straightforward once you understand each component. The accompanying video provides an excellent visual guide for assembling your new ITATOO Complete Tattoo Machine Kit, specifically designed for tattoo beginners.
This comprehensive guide complements the visual instructions, offering detailed explanations and crucial insights into safely and effectively preparing your tattoo equipment for practice. You will learn about the various parts of your machine and how they function together to create precise, controlled lines.
Understanding the Core Components of Your Beginner Tattoo Kit
Before you begin the assembly process, it is beneficial to familiarize yourself with the essential parts included in your beginner tattoo kit. Each component plays a vital role in the tattooing process, contributing to both functionality and safety.
Imagine if you were building a model airplane; each part has a specific place and purpose, ensuring the final product operates correctly. Similarly, understanding your tattoo machine kit helps you achieve a proper setup and maintain optimal performance.
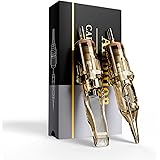
The Tattoo Machine Body and Frame
This is the central part of your setup, housing the motor (for rotary machines) or coils (for coil machines) that drive the needle. The frame provides the structural integrity for attaching other essential parts, ensuring stability during use.
Typically, a robust frame crafted from materials like aluminum or brass supports all the working mechanisms. Beginners often find rotary machines easier to control due to their consistent, smooth operation.
Power Supply: The Energy Source
Your tattoo machine requires a consistent and adjustable power source to function correctly. The power supply unit converts standard electrical current into a stable voltage suitable for your machine.
It typically features controls to regulate the voltage, allowing you to fine-tune the machine’s speed and power. Ensuring your power supply works normally is a critical first step, as explicitly mentioned in the video’s little tips section.
Foot Pedal and Clip Cord: Control and Connection
The foot pedal acts as your on/off switch, providing hands-free operation of your tattoo machine. This allows you to maintain focus on your artwork without diverting attention to manual controls.
The clip cord serves as the vital link, connecting your tattoo machine to the power supply unit. This durable cable transmits the regulated power, enabling the machine to operate effectively.
Tattoo Needles and Tips: Precision and Hygiene
Tattoo needles are single-use, sterile instruments designed to implant ink into the skin. They come in various configurations, each suited for different tattooing tasks like lining, shading, or coloring.
The stainless tip, or disposable cartridge tip, guides the needle precisely and holds a small reservoir of ink. It is essential to use the correct tip size and type that matches your chosen needle configuration for optimal results.
Grommets and Allen Keys: Small but Essential Details
Grommets are small rubber or silicone accessories that secure the needle bar to the armature bar of a coil machine, reducing vibration and ensuring stable needle movement. They play a crucial role in maintaining consistent needle stroke.
Allen keys are specialized wrenches used for tightening various parts of your tattoo machine, such as the tube and handle. These tools ensure all components are securely fastened, preventing any unwanted movement during operation.
Step-by-Step ITATOO Tattoo Machine Assembly Guide
Properly assembling your tattoo machine is paramount for both safety and performance. Follow these detailed instructions, expanding upon the visual cues provided in the video, to set up your ITATOO beginner tattoo kit.
This methodical approach minimizes errors and ensures your equipment functions as intended. Consider each step carefully, as a secure setup contributes significantly to a smoother tattooing experience.
Attaching the Tube and Handle Securely
Begin by taking the aluminum tube and handle section from your kit. This part holds your tattoo tip and needle, making its secure attachment absolutely necessary.
Align the tube with the machine’s front connection point. Utilize the provided Allen key to firmly tighten the tube and handle, ensuring there is no wobble or looseness once fastened.
Securing the Stainless Tip for Needle Guidance
Once the tube and handle are in place, insert your chosen stainless tip into the front end of the tube. This tip guides the needle and helps regulate ink flow during the tattooing process.
Employ the same Allen key used previously to tighten the stainless tip firmly. This dual tightening action ensures both the handle and the tip are robustly fixed, creating a stable platform for your needle.
Properly Inserting the Tattoo Needle
Now, carefully unpackage a sterile tattoo needle. Loosen the buckle on the tube, which opens a small slot for needle insertion.
Insert the tattoo needle into the tube, ensuring the needle loop at the top hooks onto the armature bar. Immediately, fix a grommet onto the armature bar’s pin, which securely holds the needle in place and prevents excessive vibration.
Adjusting the Needle Length for Precision
Needle length adjustment is a critical step for controlling the depth of ink implantation and adapting to different tattooing techniques. This adjustment significantly impacts line quality and shading consistency.
Release the buckle slightly to adjust the aluminum tube’s position, thereby controlling how far the needle protrudes from the tip. Imagine if you are drawing; a precise pencil tip gives you better control over your lines, similar to how needle length affects your tattoo.
Connecting Your Power System and Essential Checks
With your tattoo machine assembled, the next phase involves connecting it to the power supply system. This ensures your machine receives the necessary energy to operate efficiently and safely.
Carefully follow these instructions to establish a reliable connection between your foot pedal, clip cord, and power supply unit. A stable electrical connection is fundamental for consistent machine performance.
Setting Up the Foot Pedal
The foot pedal acts as your control switch, allowing you to activate and deactivate the tattoo machine instantly. Connect the foot pedal’s cable into the designated “FOOT” input port on your power supply unit.
Position the foot pedal conveniently on the floor where you can comfortably operate it with your foot while tattooing. This ergonomic placement ensures fluid control during prolonged sessions.
Attaching the Clip Cord to Your Tattoo Machine
The clip cord transmits power from the supply to your machine. Attach one end of the clip cord to the two connection points on the back of your tattoo machine.
Subsequently, plug the other end of the clip cord into the “MACHINE” or “OUTPUT” jack on your power supply. Ensure both connections are secure and stable to prevent power interruptions.
Verifying Power Supply Functionality
Before any tattooing begins, it is absolutely essential to verify that your power supply unit is working correctly. Plug the power supply into a standard electrical outlet.
Many power supplies feature a digital display or indicator lights that confirm power activation. Confirm that the display illuminates and the voltage controls are responsive, ensuring the unit is ready for use.
Key Considerations for Beginner Tattoo Machine Users
Beyond assembly, understanding best practices and essential considerations significantly enhances your journey as a beginner tattoo artist. These additional tips extend beyond the mechanical setup, focusing on safety, practice, and continued learning.
Embracing these guidelines from the outset helps build a solid foundation for responsible and effective tattooing. Your journey with your new beginner tattoo kit will be much smoother with these insights.
Prioritizing Hygiene and Sterilization
Tattooing involves breaking the skin barrier, making stringent hygiene and sterilization protocols non-negotiable. Always use new, individually packaged, and sterile tattoo needles for every session.
Clean and disinfect all reusable components, such as your machine grip and tips if they are not disposable, thoroughly before and after each use. Furthermore, wear disposable gloves and utilize barrier film on your machine and work surfaces to prevent cross-contamination, protecting both yourself and your practice canvas.
Effective Practice Surfaces for New Learners
Never practice on human skin when you are first learning; instead, utilize suitable practice surfaces to develop your skills. Synthetic practice skin offers a realistic feel and allows you to experiment with various techniques.
Alternatively, fruits such as oranges or grapefruits can serve as inexpensive practice mediums, simulating the texture and curvature of skin. These practice surfaces allow you to master control over your tattoo machine without any risk.
Basic Troubleshooting for Your Tattoo Equipment
Occasionally, new users might encounter minor issues with their tattoo machine setup. If your machine fails to start, first check all connections, ensuring the foot pedal, clip cord, and power supply cables are securely plugged in.
Confirm the power supply is switched on and displaying power, and verify the needle is correctly seated with the grommet. Many common problems stem from simple loose connections, which are easily remedied with a quick inspection.
Understanding Voltage and Its Impact
The voltage setting on your power supply directly influences the speed and force of your tattoo machine’s needle movement. Lower voltages typically result in slower, softer hits, suitable for delicate shading or soft lines.
Higher voltages provide faster, harder hits, which are often preferred for crisp lining or packing solid colors. Experimenting with voltage on practice skin helps you understand how different settings affect your work and control over the beginner tattoo kit.
Support and Maintenance for Your ITATOO Tattoo Kit
Even with the most robust equipment, questions and occasional issues can arise. The ITATOO Complete Tattoo Machine Kit comes with dedicated support to ensure a smooth experience for every beginner.
Maintaining your equipment properly also extends its lifespan and ensures consistent performance. Understanding the available support options empowers you to resolve any challenges confidently and keep your tattoo machine in top condition.
Leveraging Customer Support for Quality and Quantity Concerns
The manufacturers of your ITATOO tattoo kit emphasize their commitment to customer satisfaction. Should you encounter any quality or quantity discrepancies with the items in your package, do not hesitate to reach out.
Contacting their support team directly enables them to assist you promptly, addressing any issues regarding missing items or product defects. Their goal is to ensure you have a complete and functional beginner tattoo kit.
Guidance Beyond General Assembly Instructions
The instruction manual provided with your tattoo kit offers general assembly guidance, which is an excellent starting point. However, more complex operational questions or specific technical difficulties might arise as you progress.
For any further problems or detailed inquiries that extend beyond basic setup, the customer support team remains a valuable resource. They possess the expertise to provide tailored advice and solutions for your specific situation with the tattoo machine.
Free Replacement Service for Key Components
An important benefit of the ITATOO Complete Tattoo Machine Kit is the generous warranty provided for essential components. There is a free replacement service offered for tattoo machines, tattoo foot pedals, and clip cords during a 6-month period.
This policy provides significant peace of mind, ensuring that any manufacturing defects or malfunctions of these crucial parts are covered. This commitment highlights the brand’s confidence in the durability and quality of your beginner tattoo kit.
Gateway to Ink: Wormhole Tattoo Beginner Q&A
What is a beginner tattoo kit?
A beginner tattoo kit, like the ITATOO Complete Tattoo Machine Kit, provides all the essential components for new users to learn how to set up and operate a tattoo machine. It is designed to help you practice and understand each part of the tattooing process safely.
What are some of the main parts included in a beginner tattoo kit?
Key components include the tattoo machine body, a power supply to provide electricity, a foot pedal for control, a clip cord to connect the machine, and sterile tattoo needles and tips. Other small but essential parts like grommets and Allen keys are also included.
Where should I practice using my tattoo machine when I’m new to tattooing?
You should never practice on human skin when you are first learning. Instead, use practice surfaces like synthetic tattoo skin or fruits such as oranges or grapefruits to develop your skills and control.
What should I do if my tattoo machine doesn’t start?
First, check all connections to ensure the foot pedal, clip cord, and power supply cables are securely plugged in. Also, confirm that the power supply is switched on and displaying power, and that the needle is correctly seated with its grommet.
Why is hygiene and sterilization so important when using a tattoo kit?
Tattooing breaks the skin barrier, so strict hygiene is vital to prevent infections and cross-contamination. Always use new, sterile needles, clean reusable parts thoroughly, and wear disposable gloves.